
Stripe Plugin
Stripe Plugin will teach your Mautic to listen for payment events and react with campaign events. Help your team to automate payment processes and improve your customer experience at the same time.
Forget about click-through rate or open rate. Payment rate is what really matters!
Features
Magic segments
Segment filters seem like a good idea at first. But they have serious drawbacks.
The main is that contacts will get to the segment only after your cron job runs. So every 10 minutes or so. That's way too slow! Your customers expect faster reactions.
Another is, ask your server admin how much does it cost to rebuild each and every segment every 10 minutes. It's not cheap. 🤫
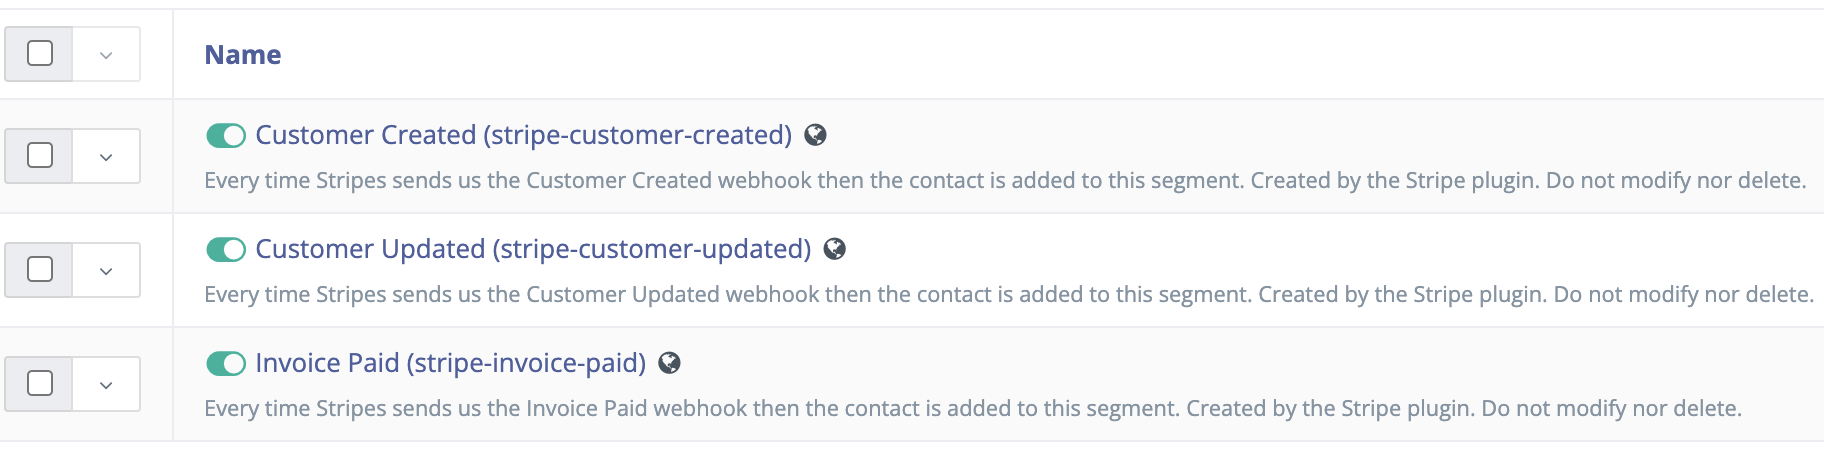
The magic is quite simple, really. When you install this plugin, it will create a new segment for each Stripe event. And every time Stripe event happens, it will add the contact to the right segment. Fast, cheap, simple.
And this simple magic allows you to run repeatable campaigns!
Segment filters
That being said, if you need a segment of all Stripe customers, we have you covered. There is a segment filter for that. It will give you all contacts that have a relation to a Stripe Customer.
Tip: Stripe Customer doesn't have to be only a contact who paid for something. It could be a someone who filled in the checkout form but the payment didn't go through. I see the 💡 that came up in your marketer mind. I smell abandoned card scenario in the air! More on that later.
Landing page tokens
Stripe gives you a short HTML code to embed pricing tables or pay buttons to Mautic Landing Pages. We've tried that, doesn't work. The editor will strip parts of the HTML. We've got you covered. This plugin comes with special tokens for pricing tables and buttons. Details in the docs.
Email tokens
Stripe already allows you to add a link to a subscription management for your customers. It allows them to insert their email address and cancel or upgrade or downgrade their subscription. It's unique to your Stripe account. So there is no need for a token. It works out of the box.
What we added a token for is the invoice link. Stripe generates an invoice for every payment. The token will find the latest invoice link in the Stripe events and send replace the token with it.
Wait, wait what about the digital asset download link? That's a core Mautic feature, don't worry.
There is one more thing that we didn't have to implement. The Stripe payment button works in the email already. It's just a link. You can send your contact to the payment gate directly from the email content. And track it with Mautic. Sweet!
Campaign conditions
Right, the abandoned cart type of workflow. There is a campaign condition that allows you to decide whether a contact went through one type of event but not another. So if you check if the "Customer Created" event exists, wait a day and check if the "Invoice Paid" event does not exist, you can send a message (SMS, email) to the contact asking what's wrong.
Once you have more than 1 product, you may want to create different workflows for different products. We have a campaign condition for just that!
Security
We've got you covered. Stripe sends the events to a public endpoint that the Stripe plugin configures. So some comedian could start sending similar events there. Don't worry, Stripe is signing each event message with secret key. You have to insert the secret key to the plugin configuration in order to be able to accept the messages. The plugin will reject all event messages that are not correctly signed.
Pricing
Documentation
Installation
Once you become our member, you receive an email with a link to download the latest version of the Stripe bundle. It will be a zip package. Here is how you install it to your Mautic instance.
Using S/FTP
- Upload the zip package to the
pluginsdirectory. - Unzip the package in the
pluginsdirectory. - Go to Plugins in the Mautic administration and click on the "Install/Update plugins" button.
Using command line
Please modify the commands according to your login details and correct paths.
scp ~/Downloads/StripeBundle.zip username@host:/var/www/yourmautic/pluginsssh username@host:/var/www/yourmautic/pluginsunzip StripeBundle.zipbin/console mautic:plugins:install
Notice that 6 new segments were created after successful installation. You can delete those you don't want. Nothing bad will happen. If the incoming Stripe event won't find the specific event, it will simply store itself without adding the contact to the segment. You may have to delete the segments you don't want after every plugin update, though.
Configuration
Once the plugin is installed, go the plugins list. You should see the Stripe Plugin within your other plugins. Save your test and production Secret keys. The plugin allows you to switch between the two so you can click one button to go live.
Magic Stripe segments
The plugin is listening for these events:
- customer.created,
- customer.updated,
- invoice.paid.
Check the Stripe docs for more details.
Webhook testing
Go to the Stripe Dashboard. Use the Test mode to test your workflows before you go live. It will allow you to make payments without actually transferring funds. Then click to Developer options and then to Webhook tab as you can see below.
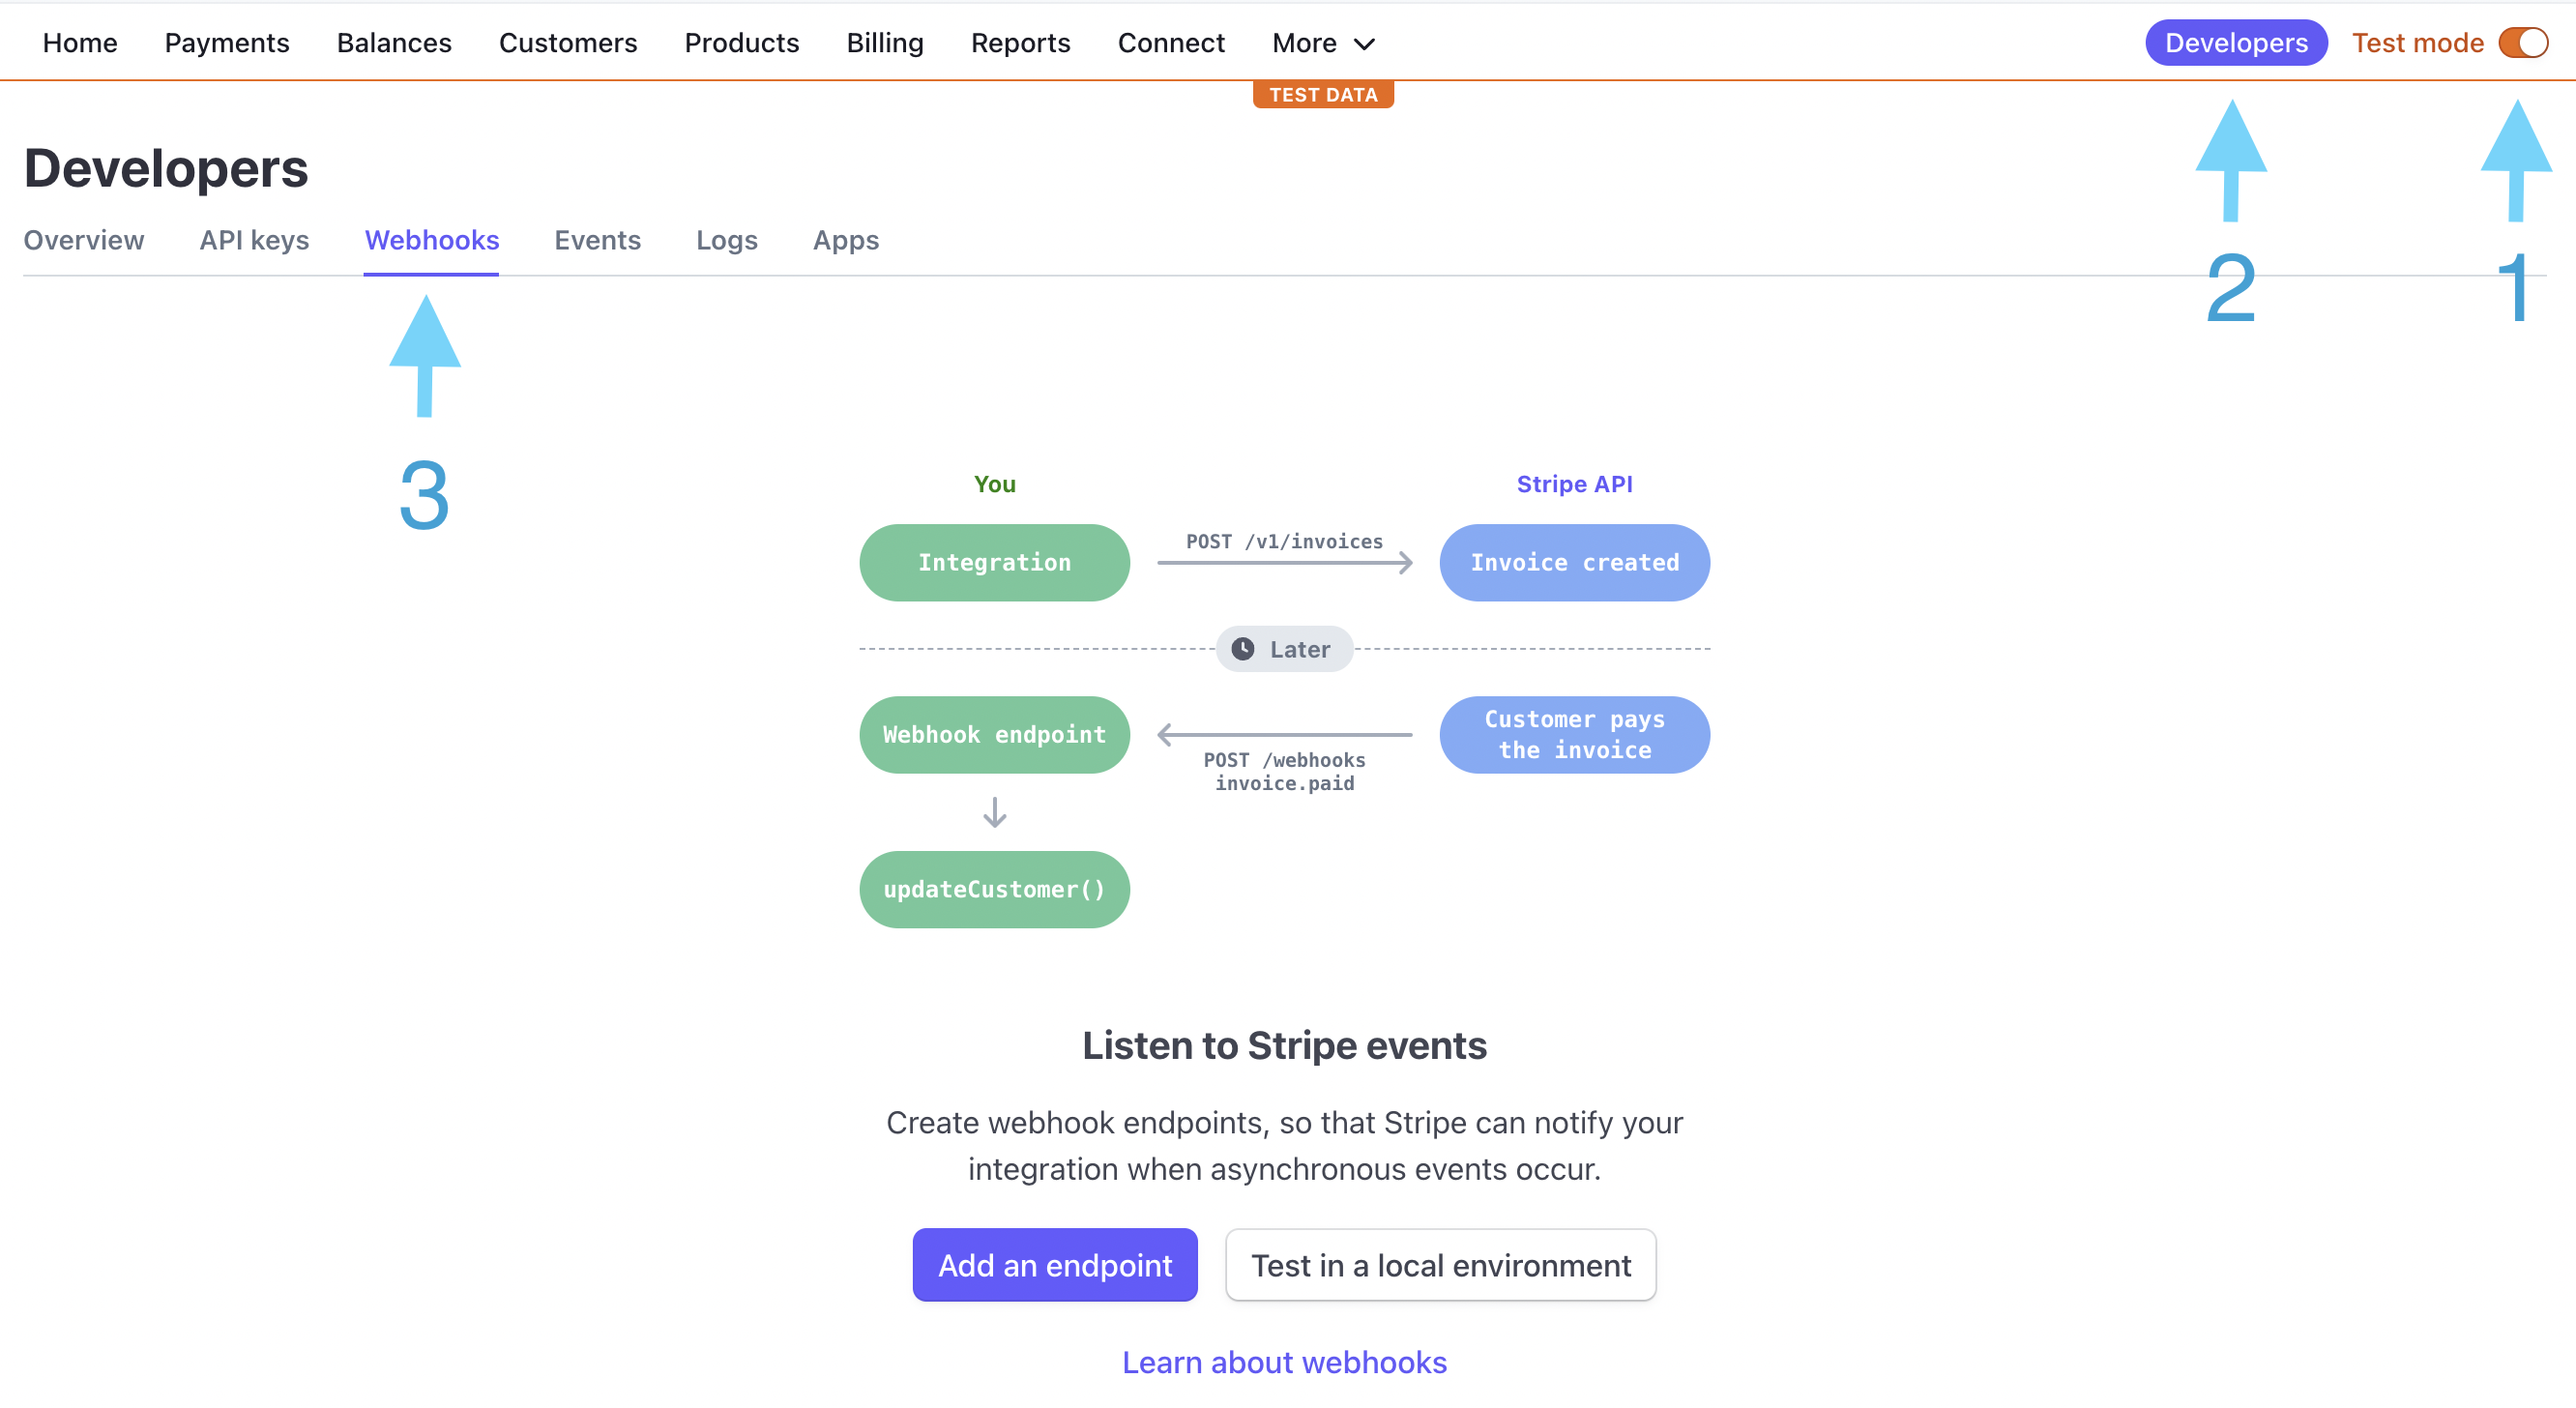
Add an endpoint. A new window will open for you.
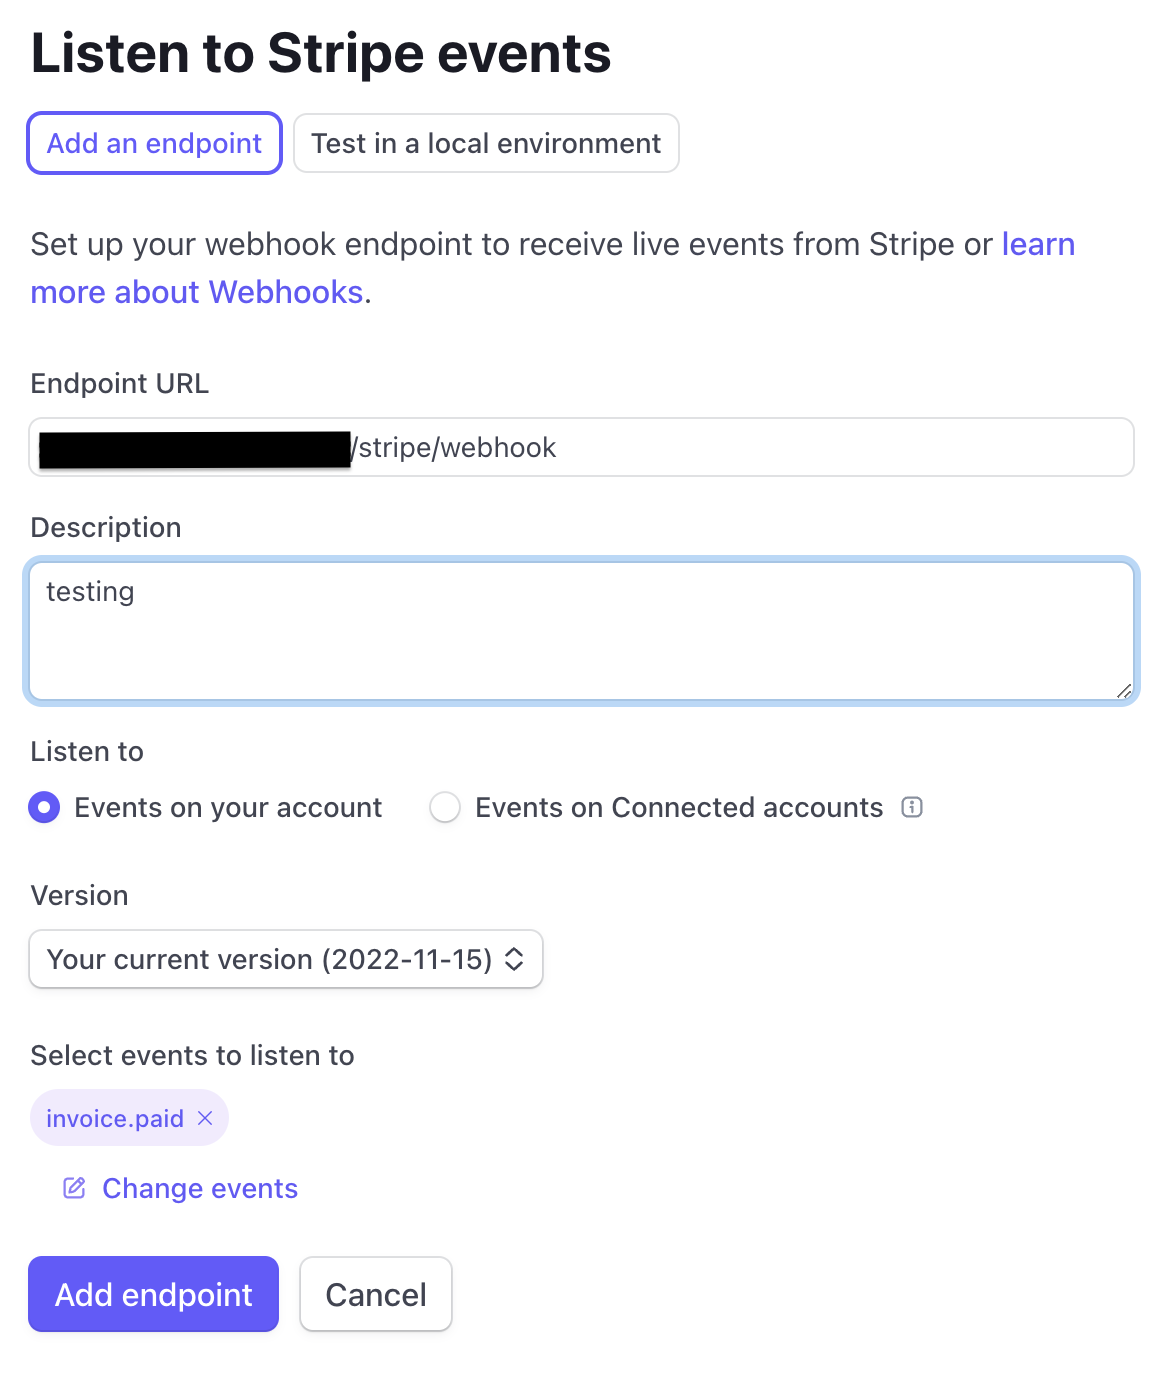
Endpoint URL is the URL address where you have your Mautic instance and ends with /stripe/webhook.
For example: https://my.mautic.com/stripe/webhook
You can describe what are you exactly testing. Choose Listen to option "Event on your account". Then what events should be listen to in the option: Select events to listen to. New window will open, where you can choose what you want to listen to invoice.paid.
With this set up you can go to your Mautic instance and in the menu choose Components. There is Landing pages option. Create new Landing page and insert tokens to builder. You can embed a pricing table by inserting this token in to the builder.
Pricing table token
The token consists of 2 variable values: tableid and key
{stripe=pricingtable tableid=your_pricing_table_id key=your_public_key}
Here is the example of pricing table token:
{stripe=pricingtable tableid=prctbl_1NrOQADr6Bz0HFJp5rYMy0sv key=pk_test_51NFhPoDe6Bz3jFroZhz2GfN3eY1754vIGBbJ1GyLhwW0SmTNqc08kfMXpLDGyy0Z4NCfsRzk4Hkp18XyKyrqk1CJ0povwXV0DC }
tableid
Tableid part is unique for the pricing table. Click to More and choose option Product catalog in the Stripe app.
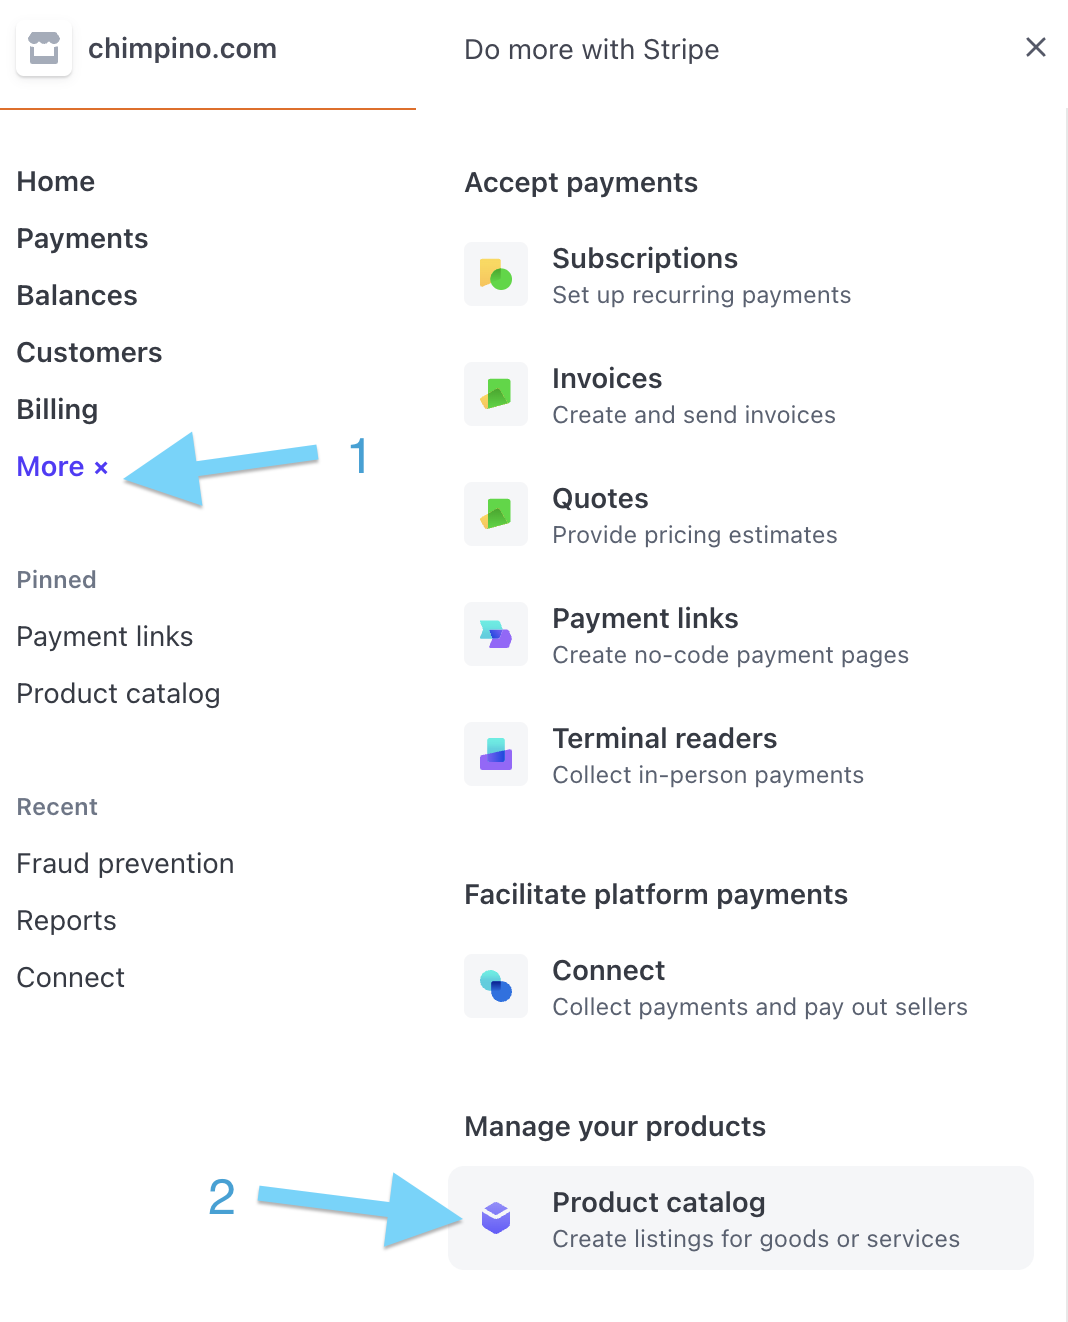
If you do not have any products you have to create some products. Now you can open Pricing tables tab in the Product catalog section. If you already do not have pricing table, you have to create one. Then open the pricing table and there you can see the tableid in the HTML code below.
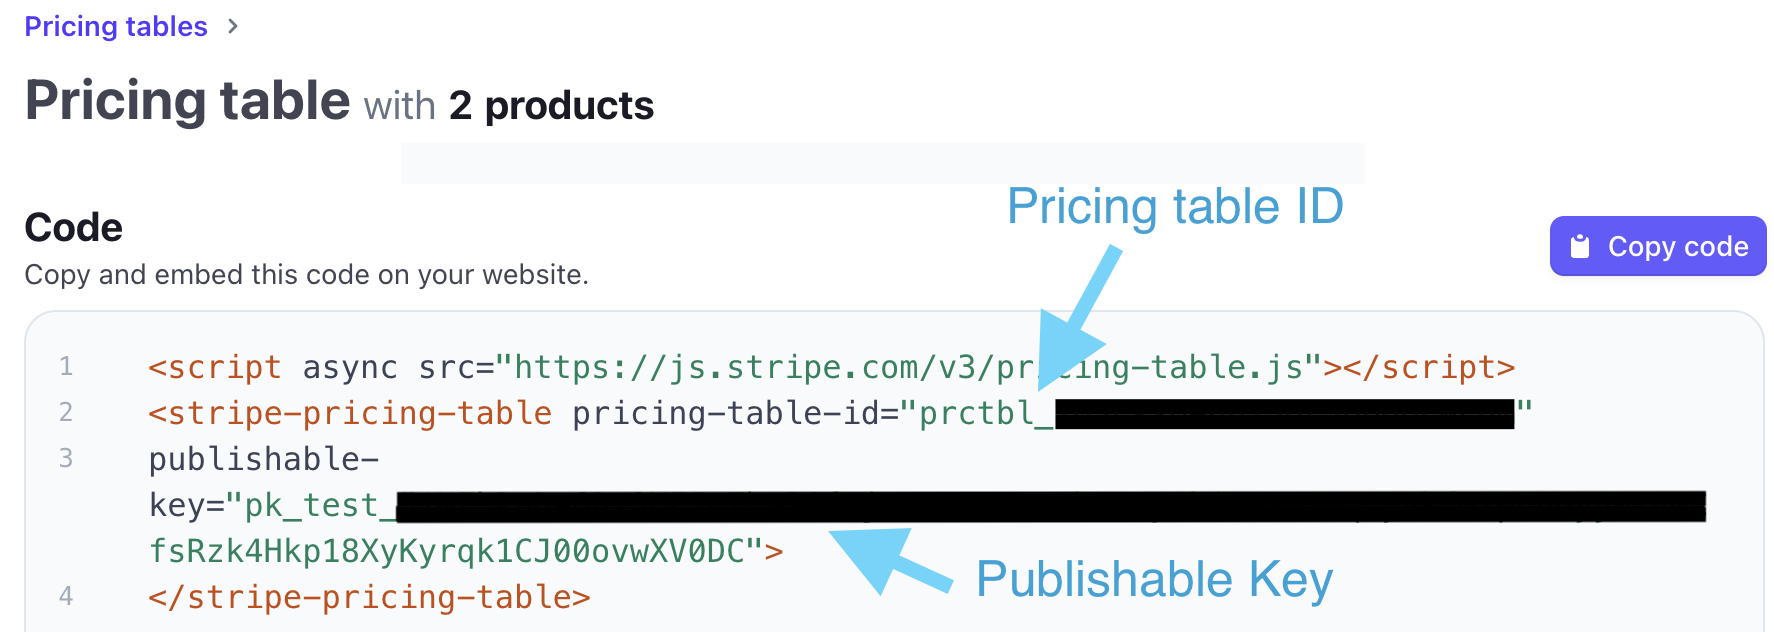
key
Key is your publishable key of your Stripe app. Go to Developer tab. Choose API keys and copy the Publishable Key. Or you can copy the publishable key from the definition of the pricing table as you can see in the picture above.
More about this price table process you can see in the documentation.
The buy button token can be used in the builder to get your payment with.
Buy Button token
The token consists of two variable values: buttonid and key
{stripe=buybutton buttonid=your_buy_button_id key=your_public_key}
Here is the example of buy button token int the builder:
{stripe=buybutton buttonid=buy_btn_1O2FuLDe6BP3HFJoDlpV9uIg key=pk_test_51NFhPoDe6Bz3jFroZhz2GfN3eY1754vIGBbJ1GyLhwW0SmTNqc08kfMXpLDGyy0Z4NCfsRzk4Hkp18XyKyrqk1CJ0povwXV0DC }
buttonid
Buttonid part is unique for the buy button. Go to Stripe app. Choose More and option Payment links. Make New, there you choose what product should be possible to buy through buy button and confirm it in the right side of the page. Then click to Buy Button as you can see below.

You can just copy the buy buttonid from the HTML code below.
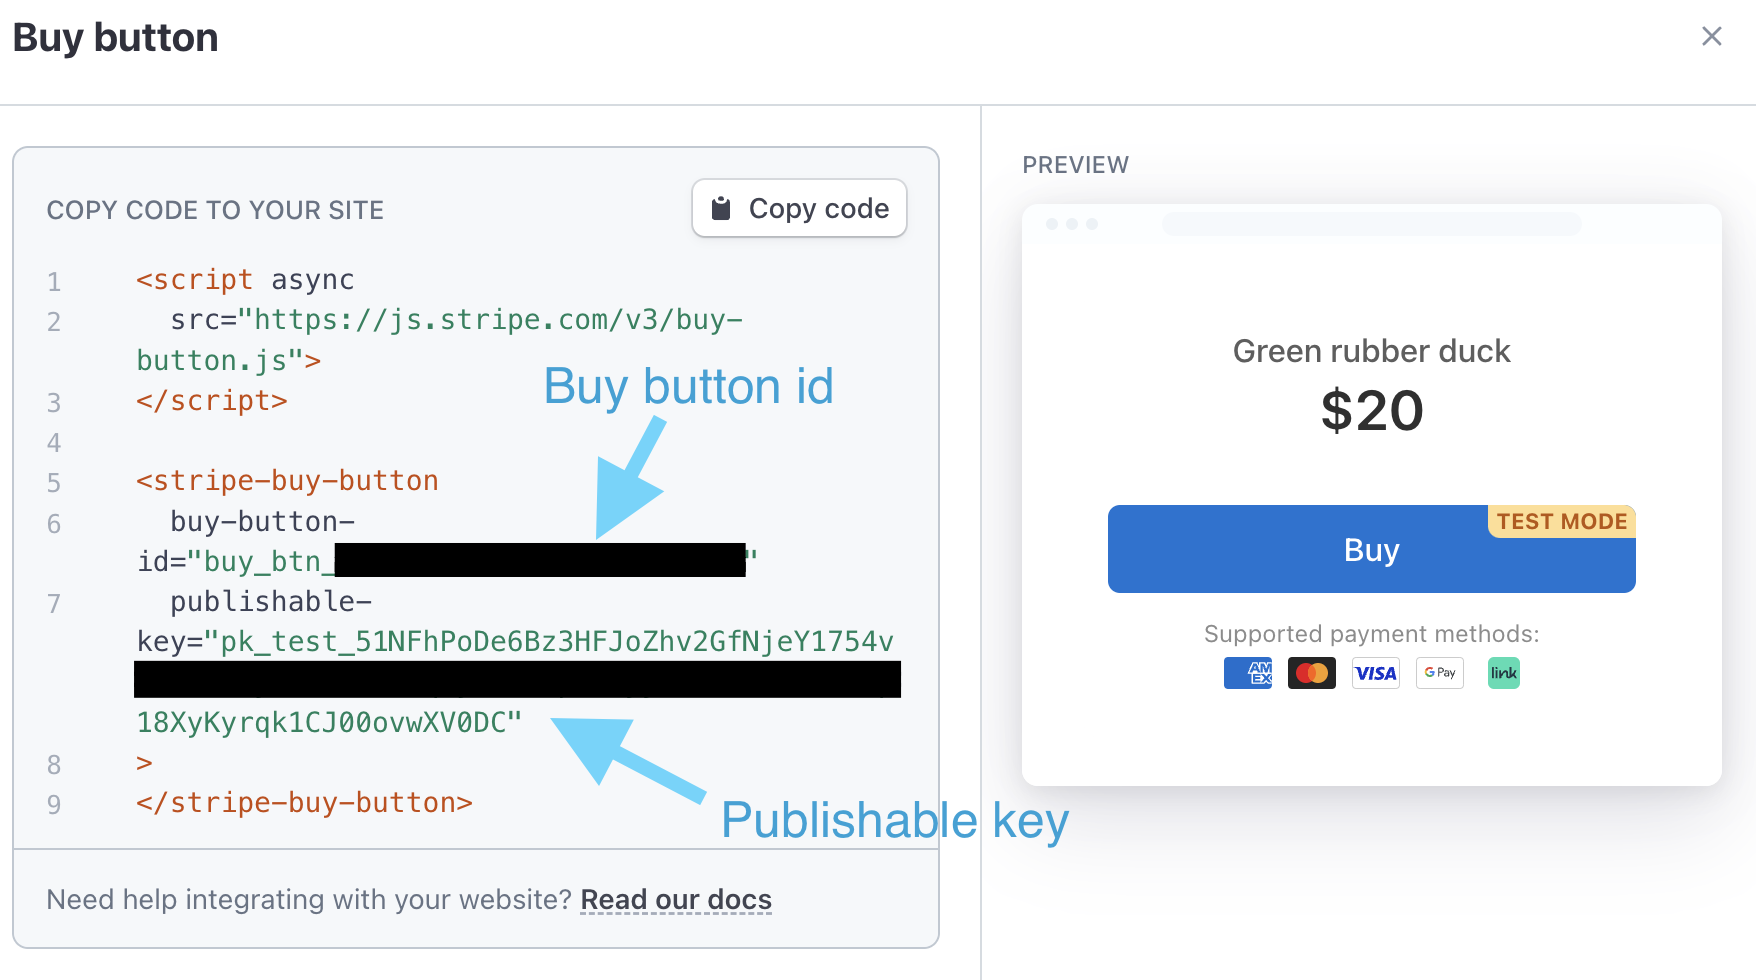
key
Key is your publishable key and it is the same as the key in the pricing tableGo to Developer tab. Choose API keys and copy the Publishable Key. Or you can copy the key from HTML code above in the buy button.
More about this buy button process you can see in the documentation.
Signing
you will need two keys Secret key and Webhook secret key.
Insert Secret key and Webhook secret key to the plugin in Mautic app (how to get Secret key or Webhook secret key, please read sections below). Switch the plugin to be enabled. Choose the mode to be used and you are ready to verify your caught events, that they are not fraud.
Secret key
Secret key is used to authenticate API request to Stripe. In the Stripe app you can get Test and Production Secret key depended on chosen mode.
Go to plugins list in Mautic app and open Stripe Plugin, where you can insert the Secret key from your Stripe app from Stripe app. Go to Developers section in Stripe app and to API keys tab to reveal your Secret key. Revealed Secret key depends on chosen mode (if you are in test mode you will see only testing Secret key and if you are in production mode you will only production Secret key). Please note that the production Secret key can be revealed only once. If you loose it you will need to generate new one.
Webhook secret key
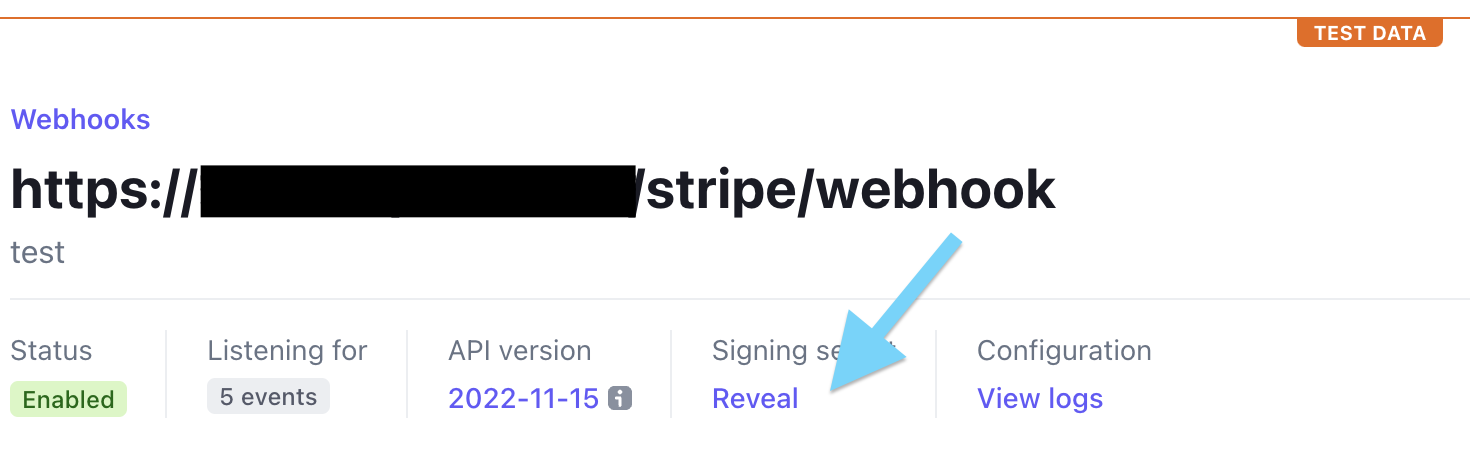
Webhook secret key is used to verify webhook (event) messages.
You can get test and production Webhook secret key in the Stripe app. Go to Stripe app to Developer section, there is Webhooks tab. Open your Hosted endpoints URL. You can see Signing secret part to be cevealed. Click to Reveal and you copy the Webhook secret key to Stripe Plugin set up in Mautic app.
Campaign
Make campaign in the main menu and use the special Stripe segments, Stripe Invoice Paid etc. For example send email with the invoice to the customer if customer buys your product and you receive webhook invoice.paid.
Landing page
If you wish to use Mautic landing pages to sell your products or services, go to Components > Landing Pages in the main menu. Add new landing page and in the builder insert token which you want to use (Pricing table or Buy button). Save it and open through the URL.
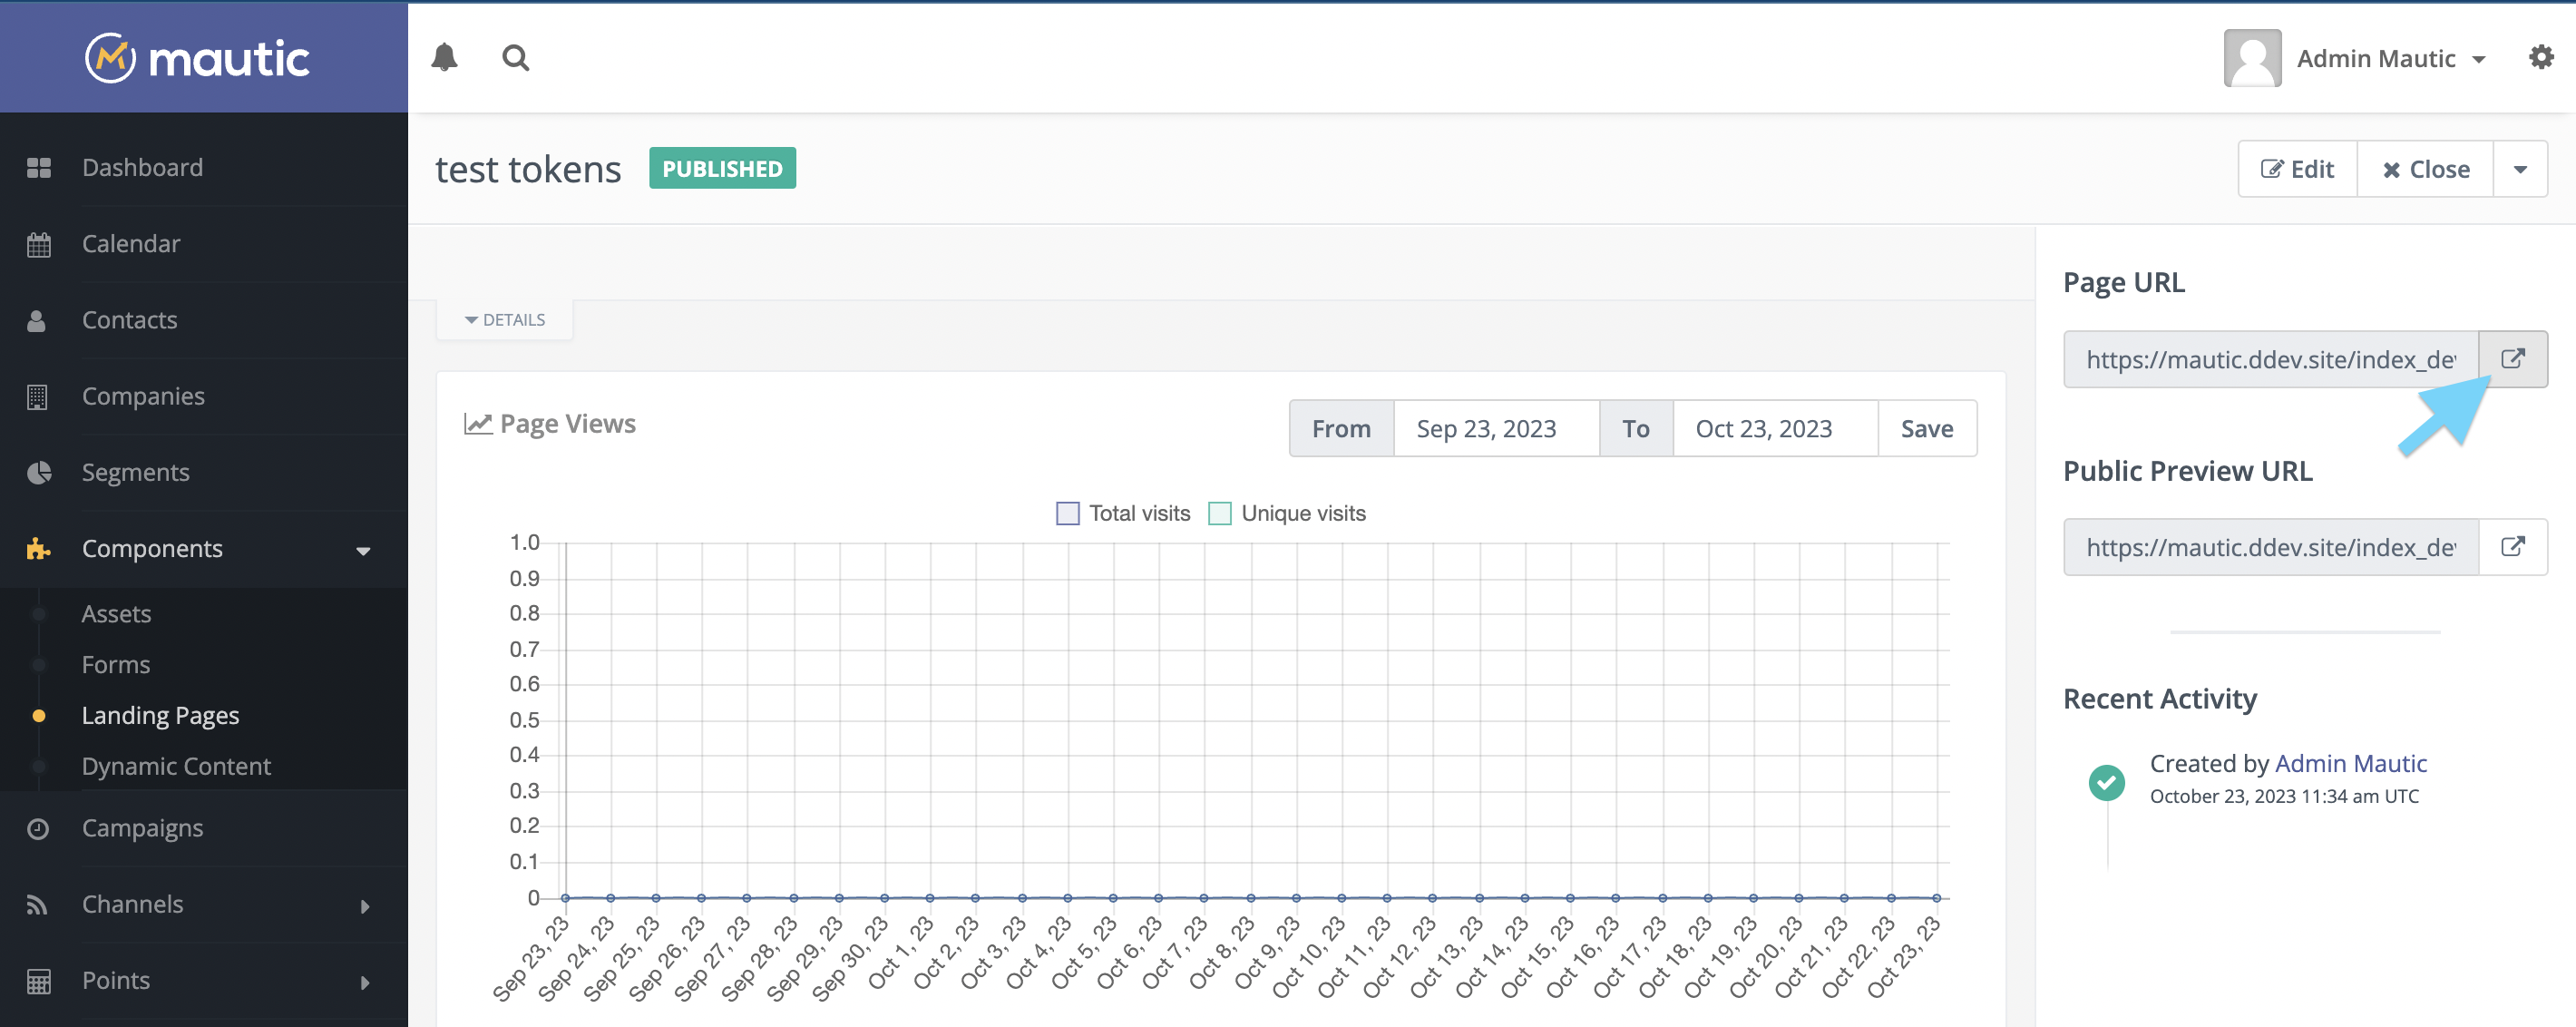
Landing page will open with the pricing table or buy button or both. You can "buy" subscription or use buy button virtually. Virtual payment can be made virtual card 4242 4242 4242 4242 with future expiration date (for example: 12/34) and fill the other informations as you want. More about simulating payment is in the documentation.
FAQ
Why did you go with the subscription payment model over one time payment?
We are going for a sustainable monetisation model. We want to evolve this plugin and add even more value to our members over time. See the Roadmap for what we plan. We are sure our members will appreciate that the plugin will get:- new features
- bug and security fixes
- updates for new PHP and Mautic versions
- support
The subscription model will allow us to do that. As a software users ourselves we hate it when the maintainer of a software we use stops supporting it. We don't want it to happen to our customers.